First you draw the head of your character on a transparent layer and make it as simple as possible, to avoid complications later, example;

Once you have the head, create another layer, and follow these instructions;
1.) Pen Tool

2.) Click Shape at the top.


3.) Click right where the chin would start on your head and join with a neck.
(A small blue dotted square will appear indicating its registered.)

Then name the layer Origin and make sure it is under the layer with the head, for easy understanding we will call the other layer Head.

Now you will have a basic headship on PhotoShop and you will have two layers called Head and Origin. Now to prepare for the rest of the activity you will need to create groups shown here;
Make one or two depending on if you will make a body or not, but this tutorial will only be showing how to make a head. And a group named the name you give to your actual creation, for example I will name this creation Max.
Name the folders Head and Body (If doing a body) and a folder named your character and it should look like this;

Make sure the head folder is inside the folder named what your creation is, as it will need to be registered as one whole item. And now inside the head create a new folder and call it +Right Eye. (It is very important you + before hand)
It should look like this;
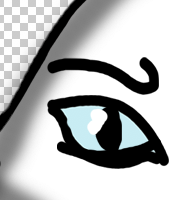
Inside the folder create three layers and name them Right Blink / +Right Pupil / Right Eyeball.
And make sure when you begin to DRAW the eye you make sure its the creations right and not your right.
Like so;

And it should then look like this;

I will now show step by step, how I made the eye for reference.
> Right Eyeball

> +Right Pupil

> Right Blink

And make sure all layers are visible once done, so it will look a little messy but that is fine;

Once done with that you can simply duplicate the folder, and therefore duplicate the layers inside, move the eye and flip it round so its in the other space and rename all the Right with Left, so you will have two folders for the separate eyes, like so;

And it will look like this;

Now you have two functioning eyes, make a separate layer inside the head folder but not in the eye folders by mistake, and call it +Nose, and simply draw a nose for your character. Like so;

Now for the eyebrows, create a new layer again and name it +Right Eyebrow, and simply draw a line or whatever type of eyebrow you would like, of course make sure that when you draw it on your character the right will be your left.
Then you can simply duplicate the layer like you did with the eye folder and move it to where you like and rename it left. Like so;


So in the checklist you should now have;
> Head
> Right/Left Eye
>Nose
>Eyebrows.
If you do not have all of this yet please look back on the tutorial to make sure you did not miss anything.
From this point on we will want a mouth, however for time reasons I will not sit here and make different mouth shapes as on an average you need about 12/15 mouth shapes in order for it to work. So I will simply go on Character Animate, pick one of the already made faces, let it take me to photoshop and drag the +Mouth folder from the existing character to my newly made character. Like so;


Now you should have a fully functioning mouth folder on your photoshop character like shown above.
Now because my character is a wolf pup, I of course need to add ears, which is just like adding eyebrows. Draw the ear out name it +Right Ear then duplicate reposition and rename +Left Ear.
Like so;


Now one last checklist to make sure you have got all items and named them correctly.
LOOK CLOSELY TO WHAT IS IN THE LIST TO MAKE SURE YOU HAVE DONE EVERYTHING EXACTLY THE SAME.
Checklist:
Folders;
Characters name with a + (Example +Max)
+Head
(Inside Head folder)
Folders;
+Right Eye
+Left Eye
+Mouth
Layers;
+Right eyebrow
+Left eyebrow
+Nose
+Left Ear
+Right Ear
(Only if you do ears of course)
Origin
Head
If you have all these layers and folders you are ready, simply save it as a .psd
Go onto Character Animator CC, file Import your character file and try see if it will copy your facial expressions and move in time with you. Good luck!
End.
No comments:
Post a Comment